앱에서 사용자들이 간편하게 로그인할 수 있는 sns 로그인 연동은 필수인 것 같습니다. 저도 안드로이드로는 구글 로그인 연동을 해봤었는데 이번에 프로젝트를 진행하면서 리액트 네이티브로는 처음 연동을 해보았습니다. 자료가 아직 많지 않은 것 같아 정리를 해보았습니다. ios앱 전용으로 테스트한 내용입니다.
1. Firebase 프로젝트 생성
구글 로그인인증을 위해서 우선 새로운 Firebase 프로젝트와 그 안에 새로운 앱을 만들어줍니다.
1) 기존 Firebase 프로젝트가 없는 경우 Firebase 콘솔로 이동하여 이름을 지정하고 새 프로젝트를 생성합니다.

2) 새 앱을 만들어 프로젝트에 연결합니다.
프로젝트 대시보드에서 ios 버튼을 눌러 앱을 추가해보겠습니다.

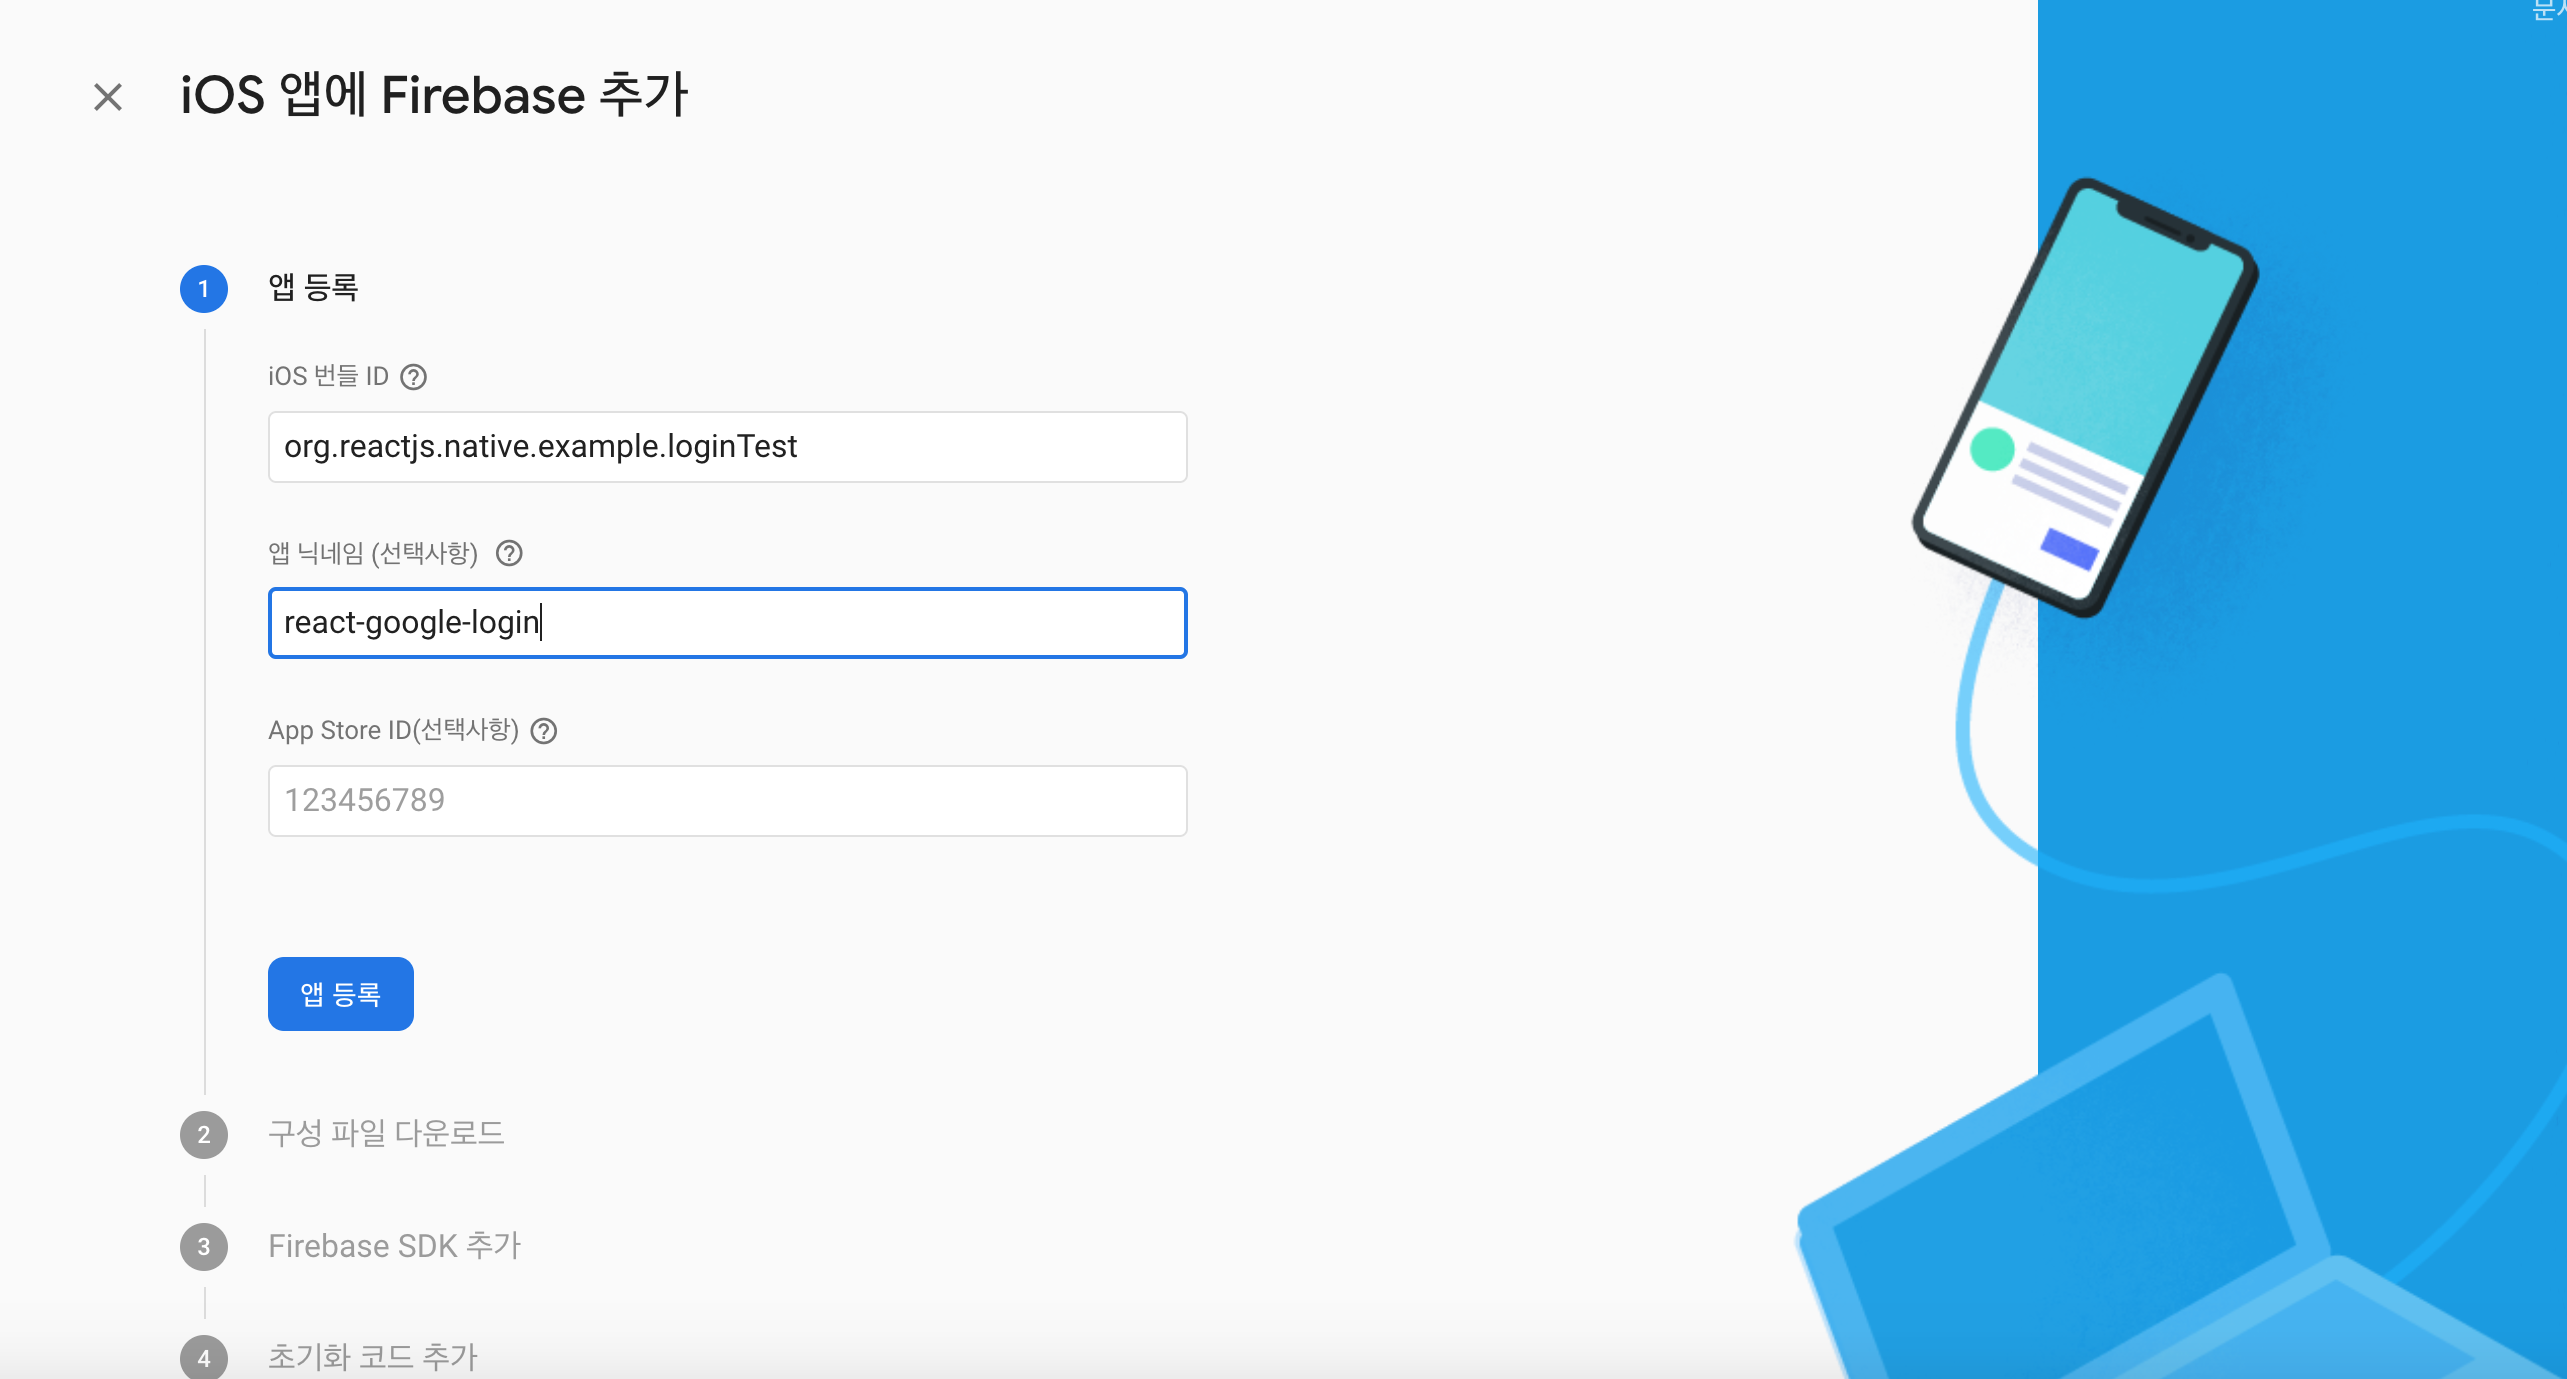
앱 등록을 위해 시키는 대로 bundle_id와 앱 닉네임을 입력해줍니다.

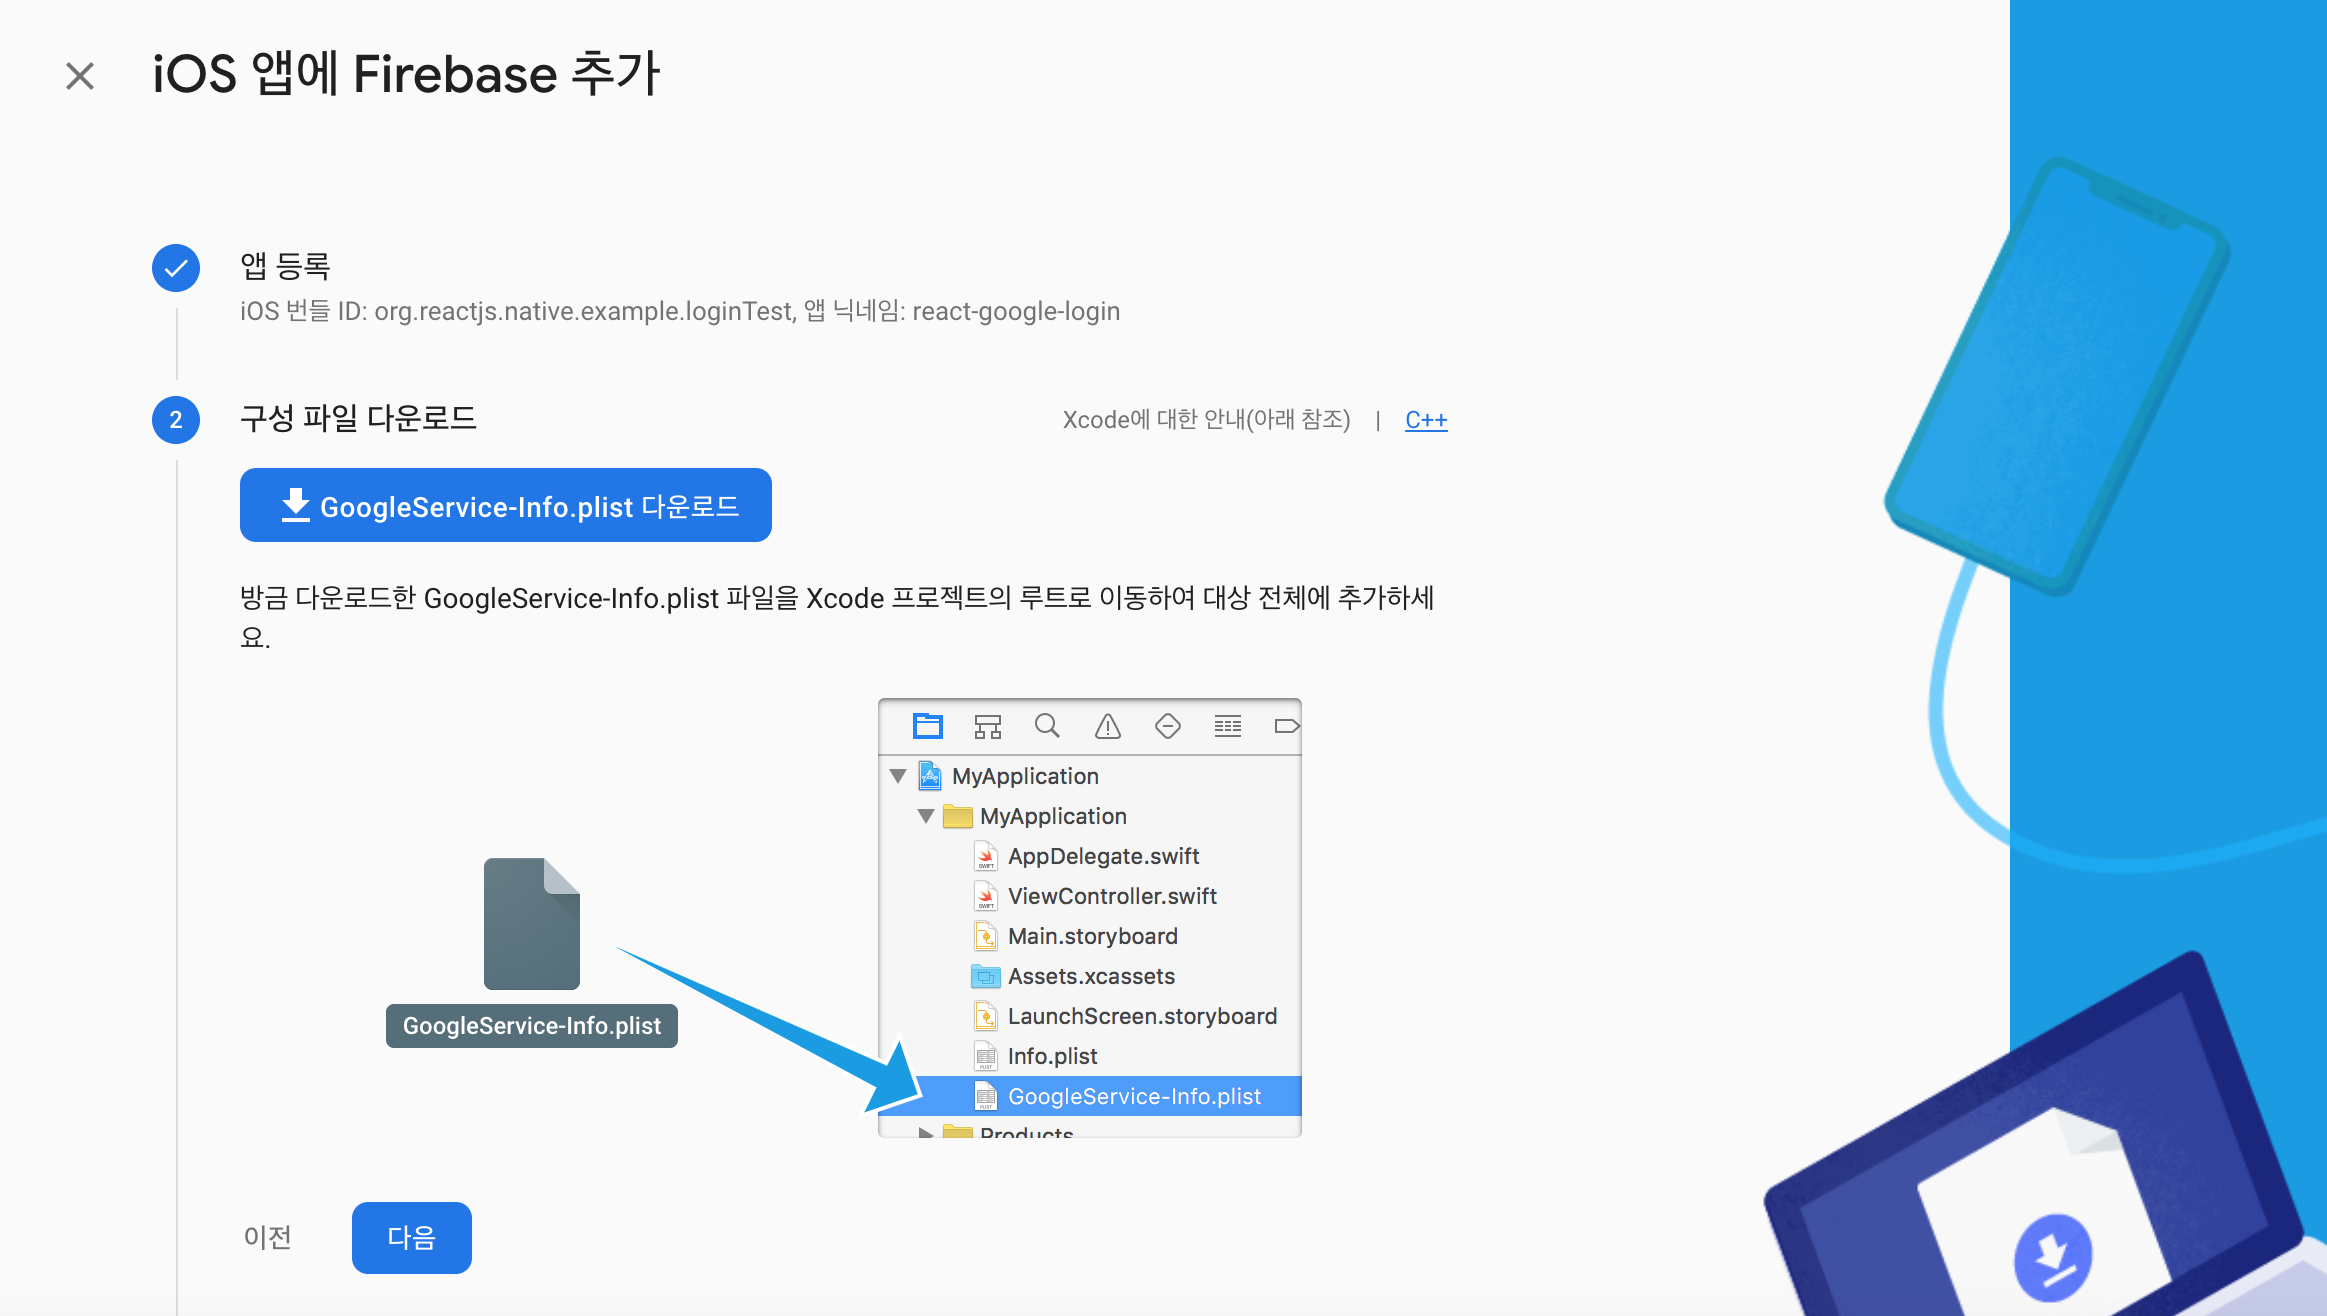
다음 단계로 IOS

2. Firebase에서 Google 로그인 활성화
앱이 Firebase 프로젝트에 연결되었으므로 콘솔로 이동하여 앱이 Google 인증을 사용하도록 설정해야 합니다.
대시보드에 들어가서
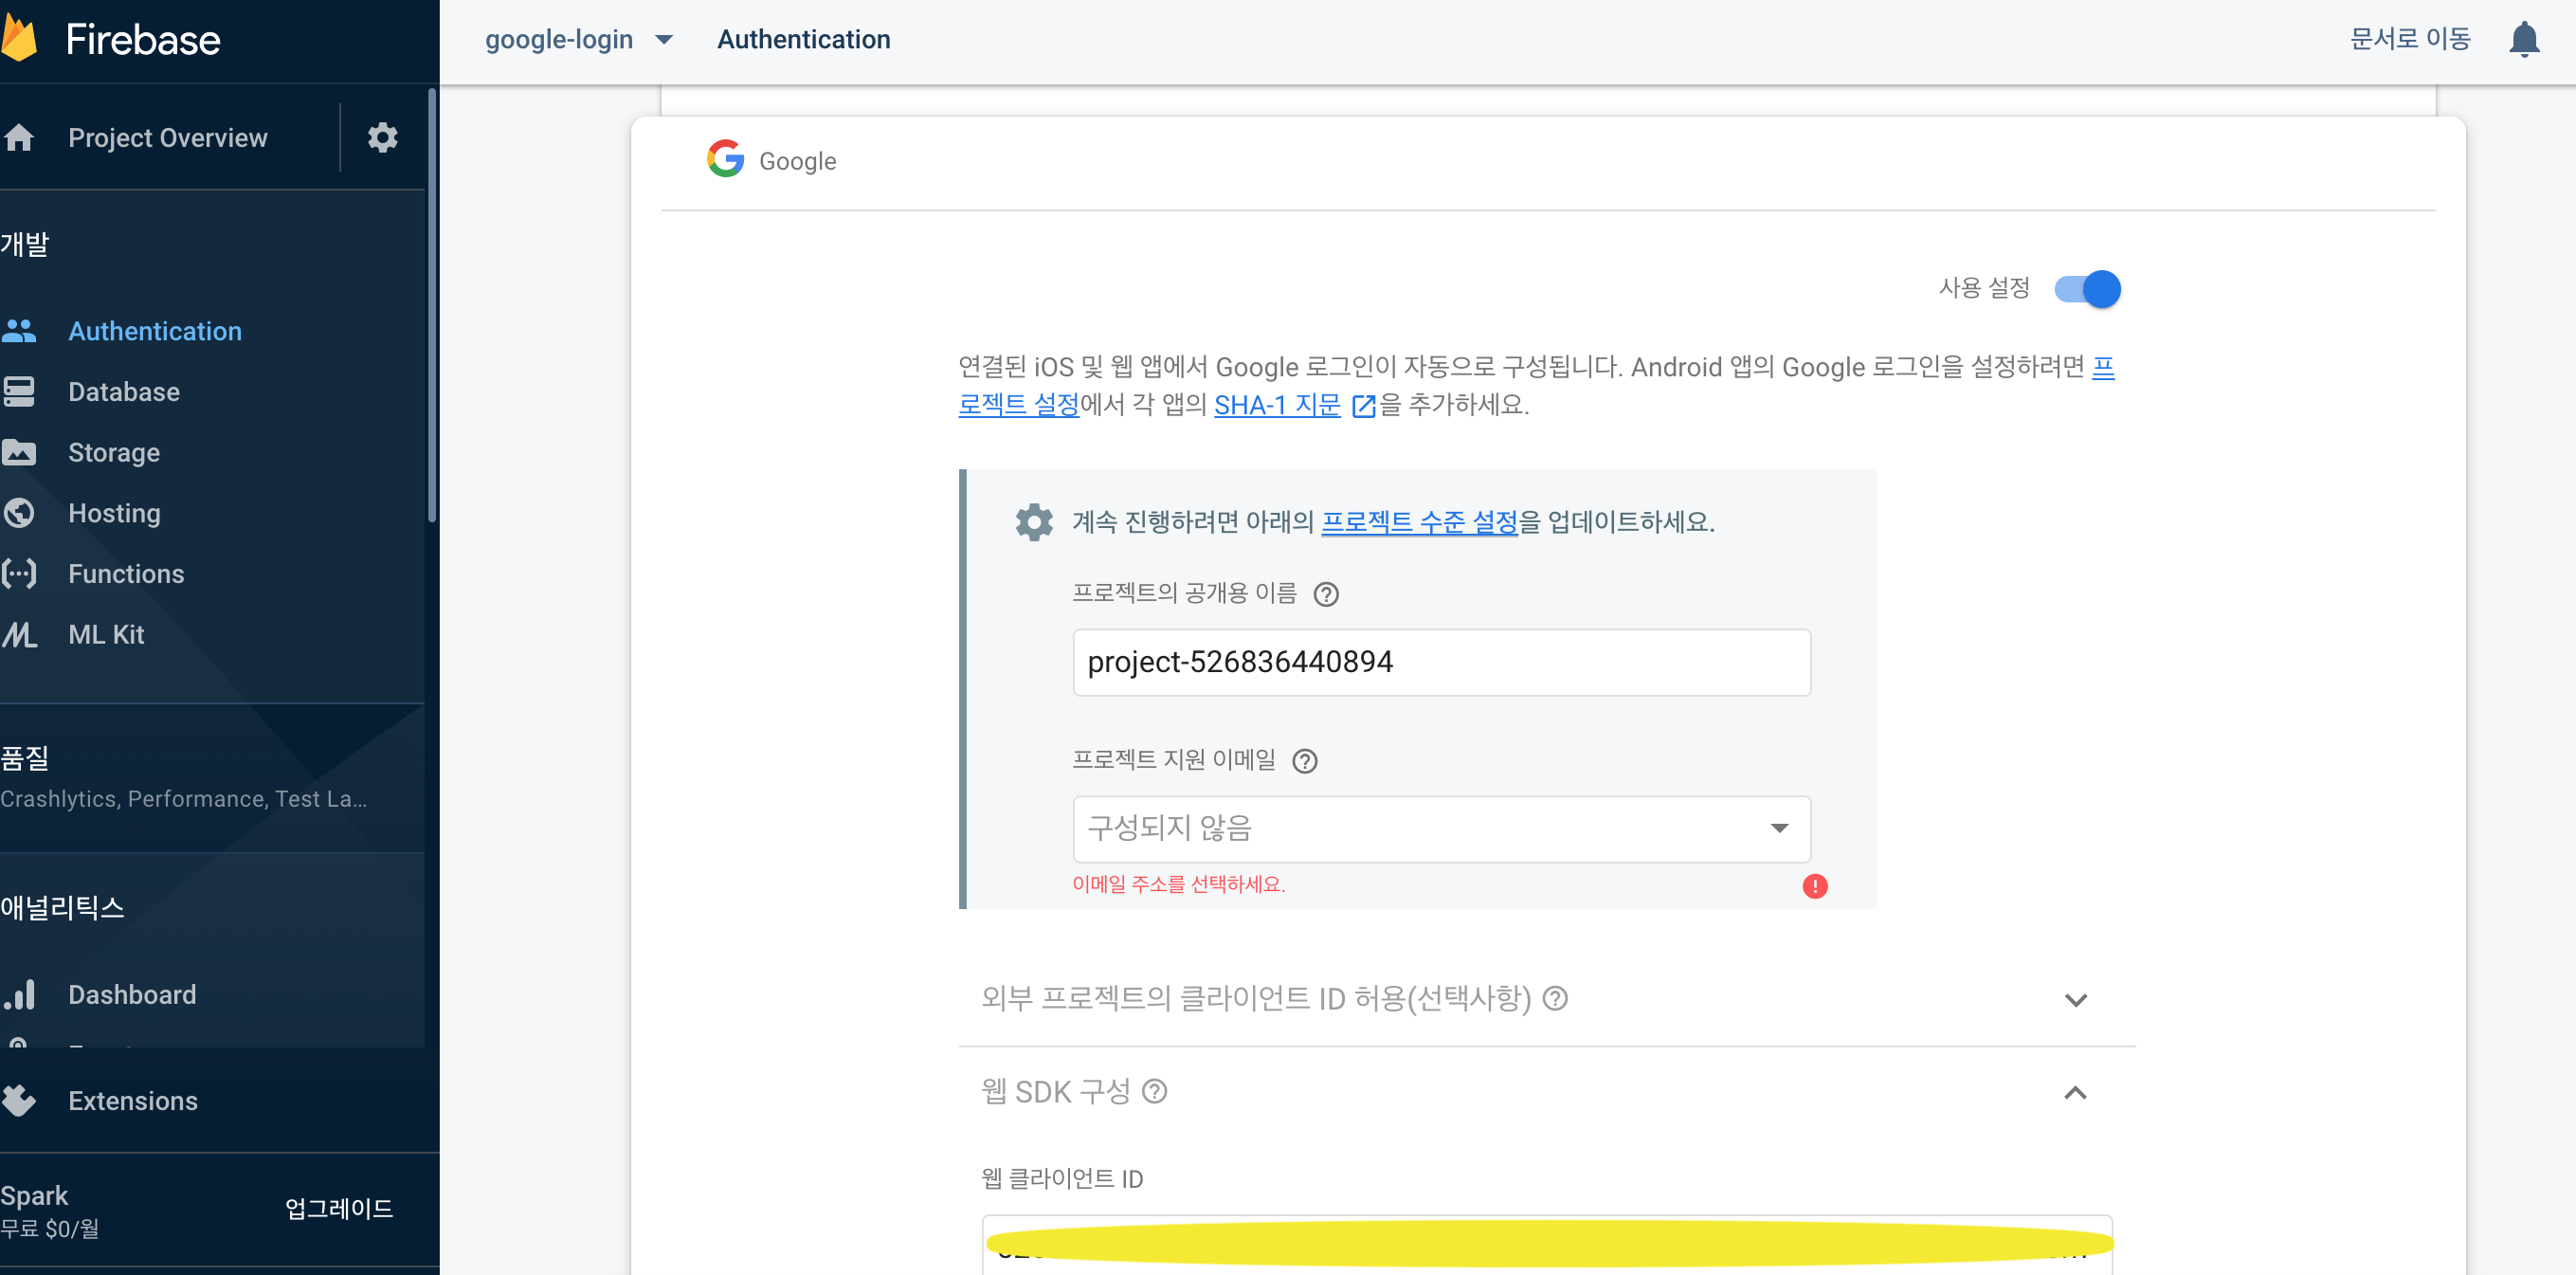
Authentication → 로그인 방법 → Google에서 토글 버튼을 눌러 사용 설정을 활성화시켜줍니다.

웹 클라이언트 ID는 나중에 쓰이니 따로 저장해둡니다.
3. google 로그인 패키지 설치
Google 로그인을 활성화하기 위해 react-native-google-signin 패키지를 설치해야 합니다.
게시물을 작성할 당시 React-Native 버전 0.61이었습니다.
1) 패키지 설치
RN >= 0.60의 경우
yarn add @react-native-community/google-signinor
npm install -save @react-native-community/google-signin
RN <= 0.59의 경우
yarn add react-native-google-signinor
npm install -save react-native-google-signin
※ 버전이 0.59 이하일 경우 iOS guide 를 보고 설정을 더 해주셔야 합니다.
2) pod파일 설치
cd ios
pod install
3) Xcode 구성
XCode에서 아래 이미지에 표시된 것처럼 URL 스키마에 REVERSED_CLIENT_ID(GoogleService-Info.plist 파일 안에 있음)을 추가합니다.

4. react-native 앱에서 로그인 기능 적용
1) 컴포넌트 추가
import { GoogleSignin, GoogleSigninButton, statusCodes } from '@react-native-community/google-signin';
2) 로그인 configure 설정
YOUR_WEB_CLIENT_ID_HERE에 전에 발급받은 웹 클라이언트 ID를 입력합니다.
  componentDidMount() {
    GoogleSignin.configure({
      webClientId: 'YOUR_WEB_CLIENT_ID_HERE',
      offlineAccess: true,
      hostedDomain: '',
      forceConsentPrompt: true,
    });
  }
3) 로그인 버튼
  <GoogleSigninButton
    style={{ width: 192, height: 48 }}
    size={GoogleSigninButton.Size.Wide}
    color={GoogleSigninButton.Color.Dark}
    onPress={this._signIn}
    disabled={this.state.isSigninInProgress} />
4) 로그인 함수
  _signIn = async () => {
    try {
      await GoogleSignin.hasPlayServices();
      const userInfo = await GoogleSignin.signIn();
      this.setState({ userInfo: userInfo, loggedIn: true });
    } catch (error) {
      if (error.code === statusCodes.SIGN_IN_CANCELLED) {
        // user cancelled the login flow
      } else if (error.code === statusCodes.IN_PROGRESS) {
        // operation (f.e. sign in) is in progress already
      } else if (error.code === statusCodes.PLAY_SERVICES_NOT_AVAILABLE) {
        // play services not available or outdated
      } else {
        // some other error happened
      }
    }
  };
5) 로그아웃 함수
  signOut = async () => {
    try {
      await GoogleSignin.revokeAccess();
      await GoogleSignin.signOut();
      this.setState({ user: null, loggedIn: false }); // Remember to remove the user from your app's state as well
    } catch (error) {
      console.error(error);
    }
  };
6) 전체 코드
import React, { Component } from 'react';
import { SafeAreaView, StyleSheet, View, Text, StatusBar, Button, Image } from 'react-native';
import { GoogleSignin, GoogleSigninButton, statusCodes } from '@react-native-community/google-signin';

class App extends Component {
  constructor(props) {
    super(props);
    this.state = {
      pushData: [],
      loggedIn: false
    }
  }

  componentDidMount() {
    GoogleSignin.configure({
      webClientId: '526836440894-d7kvi3jfopuq06jaunnqp6s10r570jel.apps.googleusercontent.com',
      offlineAccess: true,
      hostedDomain: '',
      forceConsentPrompt: true,
    });
  }

  _signIn = async () => {
    try {
      await GoogleSignin.hasPlayServices();
      const userInfo = await GoogleSignin.signIn();
      this.setState({ userInfo: userInfo, loggedIn: true });
    } catch (error) {
      if (error.code === statusCodes.SIGN_IN_CANCELLED) {
        // user cancelled the login flow
      } else if (error.code === statusCodes.IN_PROGRESS) {
        // operation (f.e. sign in) is in progress already
      } else if (error.code === statusCodes.PLAY_SERVICES_NOT_AVAILABLE) {
        // play services not available or outdated
      } else {
        // some other error happened
      }
    }
  };

  signOut = async () => {
    try {
      await GoogleSignin.revokeAccess();
      await GoogleSignin.signOut();
      this.setState({ user: null, loggedIn: false }); // Remember to remove the user from your app's state as well
    } catch (error) {
      console.error(error);
    }
  };

  render() {
    return (
      <View>
        <StatusBar barStyle="dark-content" />
        <SafeAreaView>
          <View style={styles.sectionContainer}>
            <GoogleSigninButton
              style={{ width: 192, height: 48 }}
              size={GoogleSigninButton.Size.Wide}
              color={GoogleSigninButton.Color.Dark}
              onPress={this._signIn}
              disabled={this.state.isSigninInProgress} />
          </View>
          <View style={styles.buttonContainer}>
            {!this.state.loggedIn && <Text>You are currently logged out</Text>}
            {this.state.loggedIn && <Button onPress={this.signOut}
              title="Signout"
              color="#841584">
            </Button>}
          </View>
          {this.state.loggedIn && <View>
            <View style={styles.listHeader}>
              <Text>User Info</Text>
            </View>
            <View style={styles.dp}>
              <Image
                style={{ width: 100, height: 100 }}
                source={{ uri: this.state.userInfo && this.state.userInfo.user && this.state.userInfo.user.photo }}
              />
            </View>
            <View style={styles.detailContainer}>
              <Text style={styles.title}>Name</Text>
              <Text style={styles.message}>{this.state.userInfo && this.state.userInfo.user && this.state.userInfo.user.name}</Text>
            </View>
            <View style={styles.detailContainer}>
              <Text style={styles.title}>Email</Text>
              <Text style={styles.message}>{this.state.userInfo && this.state.userInfo.user && this.state.userInfo.user.email}</Text>
            </View>
            <View style={styles.detailContainer}>
              <Text style={styles.title}>ID</Text>
              <Text style={styles.message}>{this.state.userInfo && this.state.userInfo.user && this.state.userInfo.user.id}</Text>
            </View>
          </View>}
        </SafeAreaView>
      </View>
    );
  }
}


const styles = StyleSheet.create({
  listHeader: {
    backgroundColor: '#eee',
    color: "#222",
    height: 44,
    padding: 12
  },
  detailContainer: {
    paddingHorizontal: 20
  },
  title: {
    fontSize: 18,
    fontWeight: 'bold',
    paddingTop: 10
  },
  message: {
    fontSize: 14,
    paddingBottom: 15,
    borderBottomColor: "#ccc",
    borderBottomWidth: 1
  },
  dp:{
    marginTop: 32,
    paddingHorizontal: 24,
    flexDirection: 'row',
    justifyContent: 'center'
  },
  sectionContainer: {
    marginTop: 32,
    paddingHorizontal: 24,
    flexDirection: 'row',
    justifyContent: 'center'
  },
  buttonContainer: {
    marginTop: 32,
    paddingHorizontal: 24,
    flexDirection: 'row',
    justifyContent: 'center'
  }
});

export default App;
5. 앱 실행 및 테스트
react-native run-ios
정상적으로 앱이 빌드되고 실행되는 것을 확인되고 아래와 같은 화면을 띄우는 것을 확인했습니다.

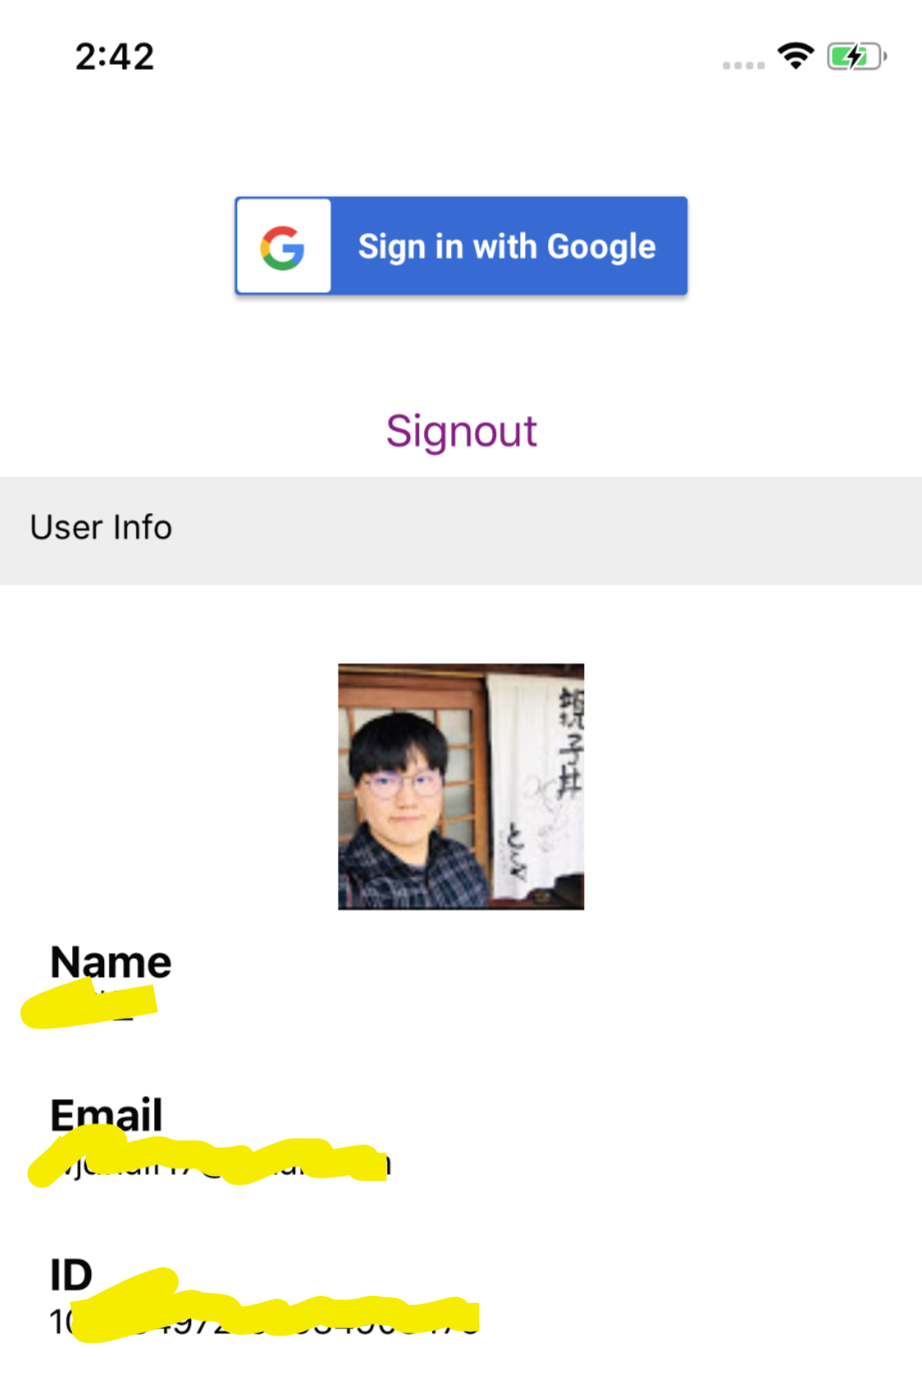
로그인 버튼을 눌러 구글 로그인을 진행하면 아래와 같이 유저 정보를 가져와서 보여줄 수도 있습니다.

이상으로 react-native 앱에서 구글 로그인을 사용할 수 있도록 구현해봤습니다. 물론 ios용으로 진행하였기 때문에 안드로이드 디바이스에서는 오류가 날 것입니다. 하지만 Android guide 를 보고 따라 하신다면 충분히 안드로이드도 적용할 수 있을 것 같습니다. 기회가 된다면 facebook 로그인과 twitter 로그인도 공유해보도록 하겠습니다.
'React-Native' 카테고리의 다른 글
| [React-Native] 리액트 네이티브 Axios로 웹서버 http 통신(요청)하기 (0) | 2019.10.19 |
|---|---|
| [React-Native] 리액트 네이티브(react-native) 프로젝트 시작하기 (0) | 2019.10.16 |
| [React-Native] react-navigation 사용하여 화면 간 이동하기 (5) | 2019.10.15 |
| [React-Native] React native 와 WebView 데이터 통신 에러 (0) | 2019.06.20 |
| [React-Native] React native 와 WebView 데이터 통신 (0) | 2019.06.19 |


